
You can configure all available incident types for Dispatcher and Responder users in the Incident Settings table.
Creating a New Incident Type
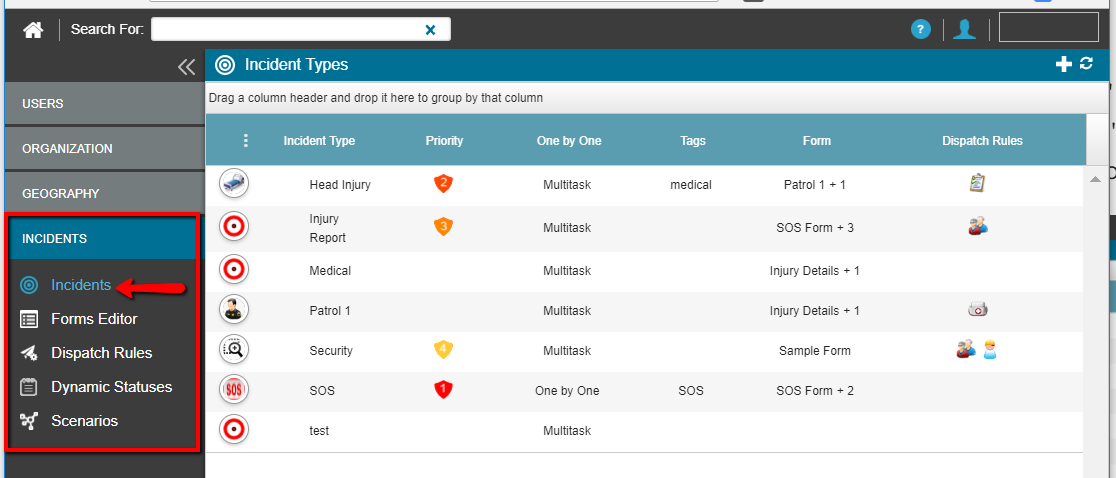
- From the Main Screen, select Settings > INCIDENTS and then Incidents.
The Incident Types table opens, displaying incidents in alphabetical order.
- Click the + symbol in the top right to add a new incident type.
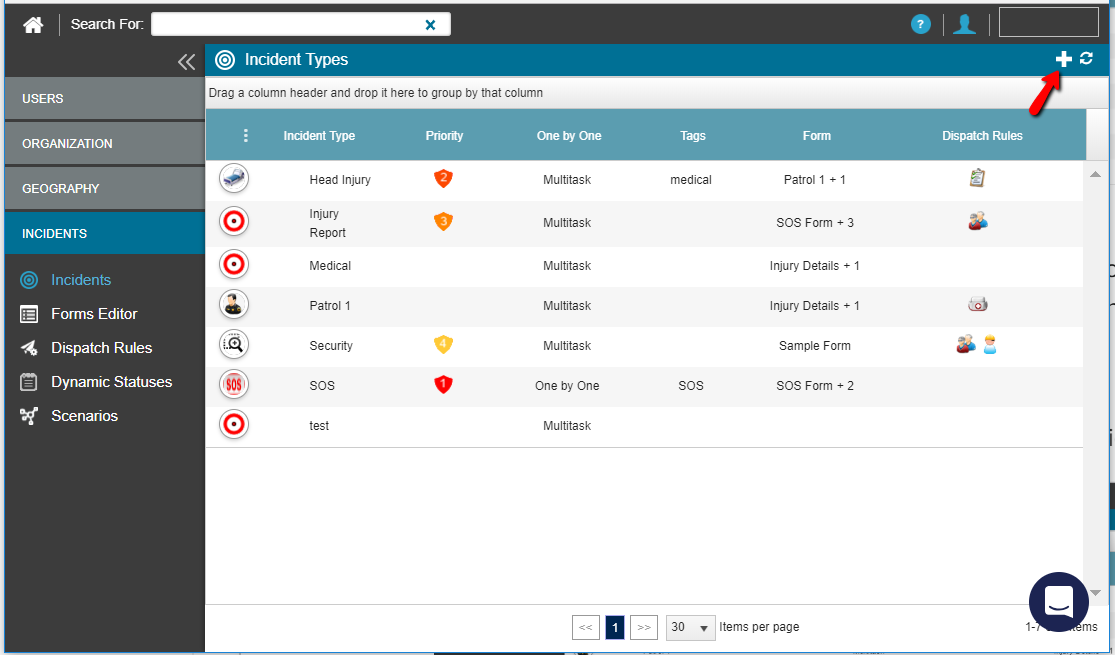
The New Incident Type window opens in the General tab.
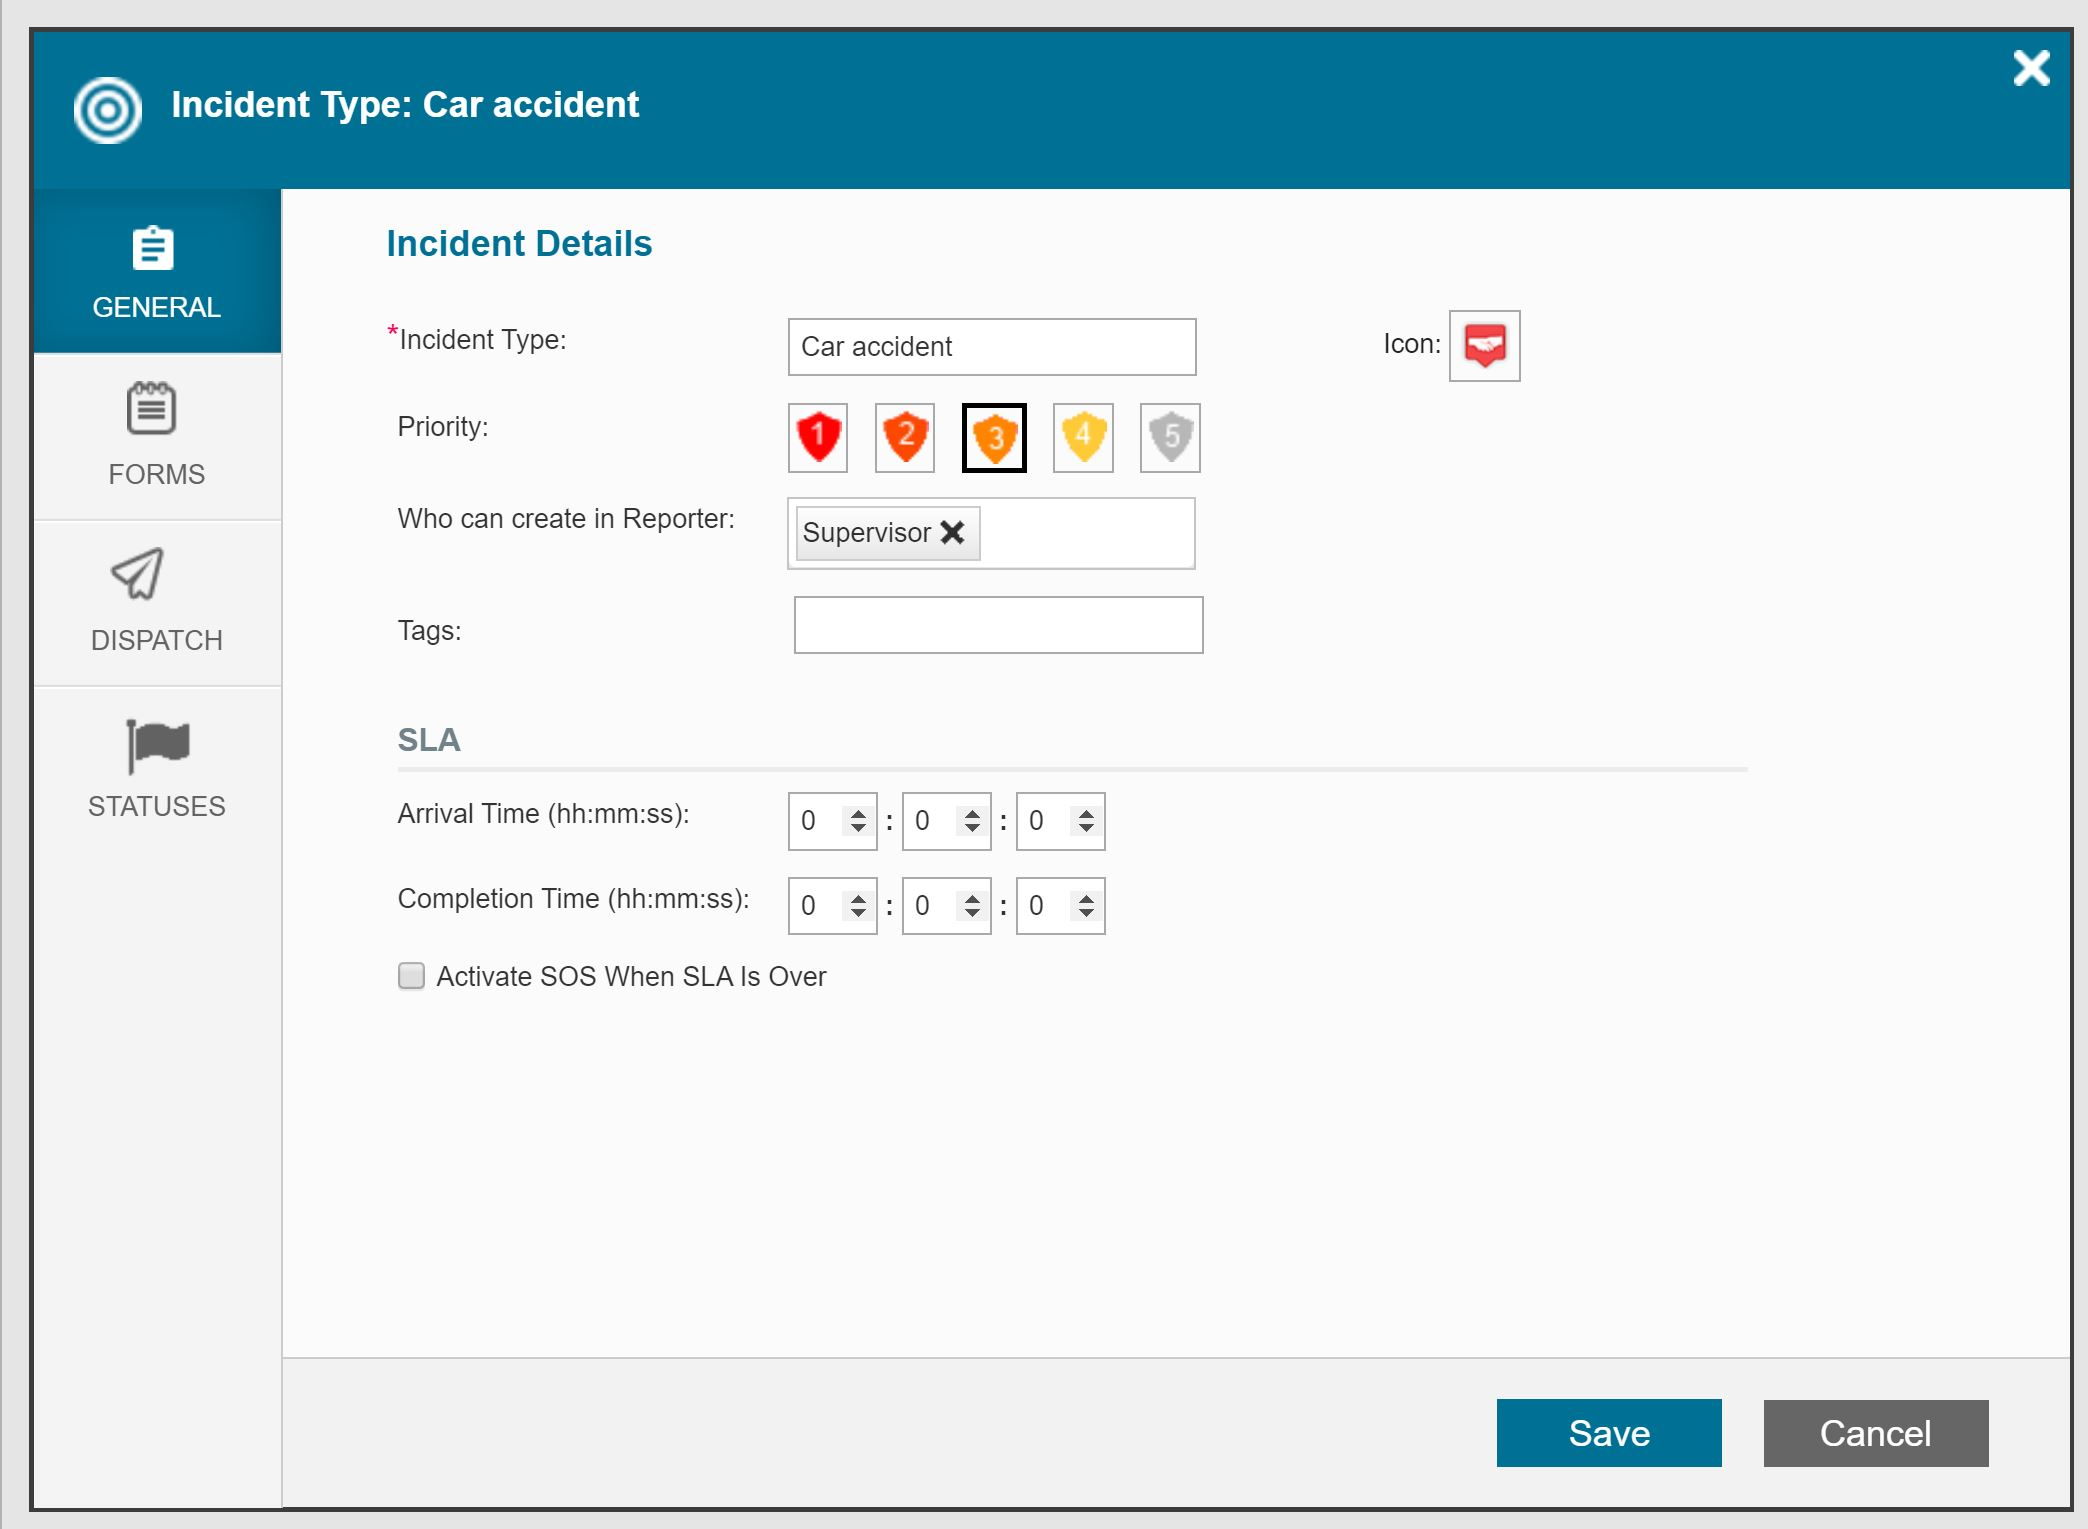
- Enter the name of the new incident in the Incident Type field.
- Click the icon to open the Search for Icon window.
When an incident of this type is active, this icon appears on the map at the incident location. It is also displayed in the incident panel on the Dispatcher screen and in the incident window. The icon appears on the mobile Responder when the Responder is dispatched to an incident.
- Click a Priority to set the incident’s priority level (1-5, where 1 is the highest).
- Select the permission profiles from Who can create the incident in Reporter to determine which mobile users can open a new incident of this type via their mobile application. Read more about creating incidents from the mobile reporter.
- Enter keywords in the Tags field.
Tags help the Dispatcher search for incident types and are used as filters for incident layers on the map.
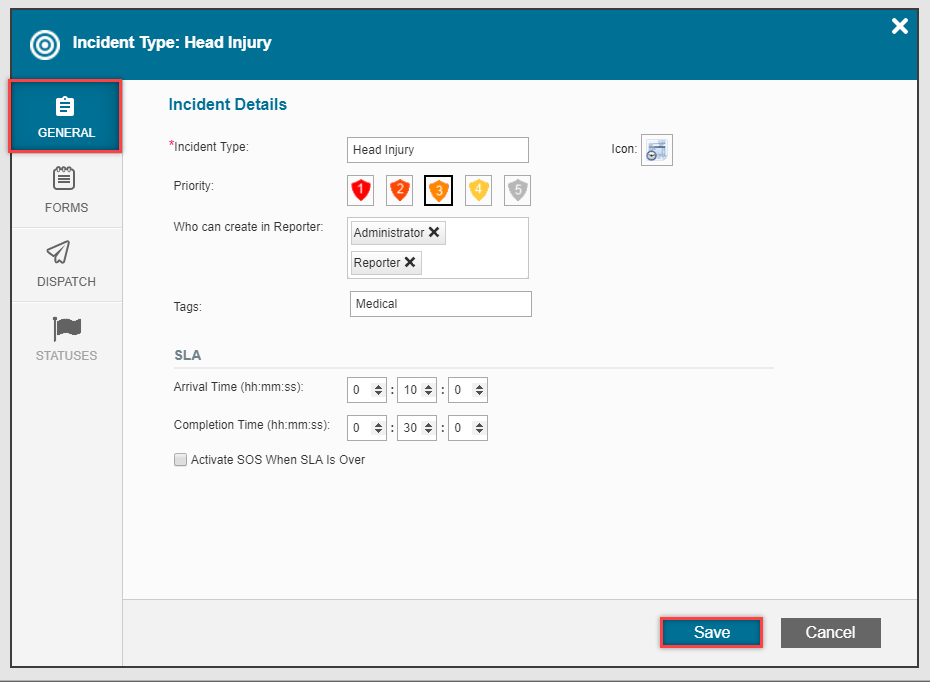
- SLA (Service Level Agreement): The SLA allows you to add two timers with alerts to an incident.
- Arrival time is the time you set as a guideline for the first Responder to arrive (on scene). The arrival time can be defined here (in the incident type settings) as a fixed timer for all incidents of this type, but can also be set in real-time by the Dispatcher for a specific incident (for example, a time that corresponds to a client).
- Completion time is the time you set as a guideline for the first Responder to complete a task (“Ready”). The completion time is defined as a countdown timer and is measured from the moment the first Responder reports on scene (arrival time). This means the time period is fixed, but the trigger for the timer changes depending on the actual on-scene report.
- Activate SOS when SLA has expired activates an SOS alarm when the SLA time has been reached. Read more about SOS alarms.
- Click Save and switch to the Forms tab.
- In the Forms tab, you can define which form templates are linked to this incident type. You can assign a name to each template and determine which Responder groups have access to each form when they fill out the form after responding to the incident.
You can link more than one form template to each incident type.
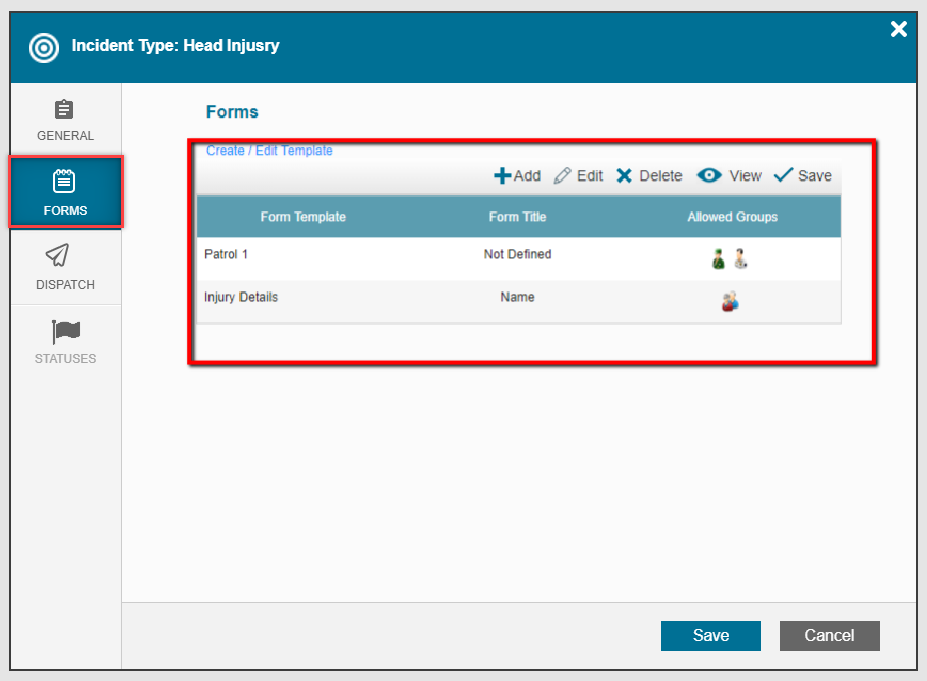
- Click the + symbol to add a new form template. Forms can:
- Be added by clicking:

- Be edited by clicking:

- Be deleted by clicking:

- Be viewed by clicking:

- Be saved by clicking:

The Forms tab contains the following columns:
- Form Template: Choose the form template you want to add to the incident type from the list of available forms.
- Form Title: The title of this form template when a user (dispatcher or mobile user) opens a new incident from this incident type. The form title is based on the field you set as Dynamic Form Title in the chosen form template, or simply the name of the form template if you have not set a field as Dynamic Form Title. See Creating and editing form templates for more information on how to set a field as Dynamic Form Title.
- Allowed Groups: Which groups can view, edit, and duplicate this form template.
Let’s look at the incident type to clarify:
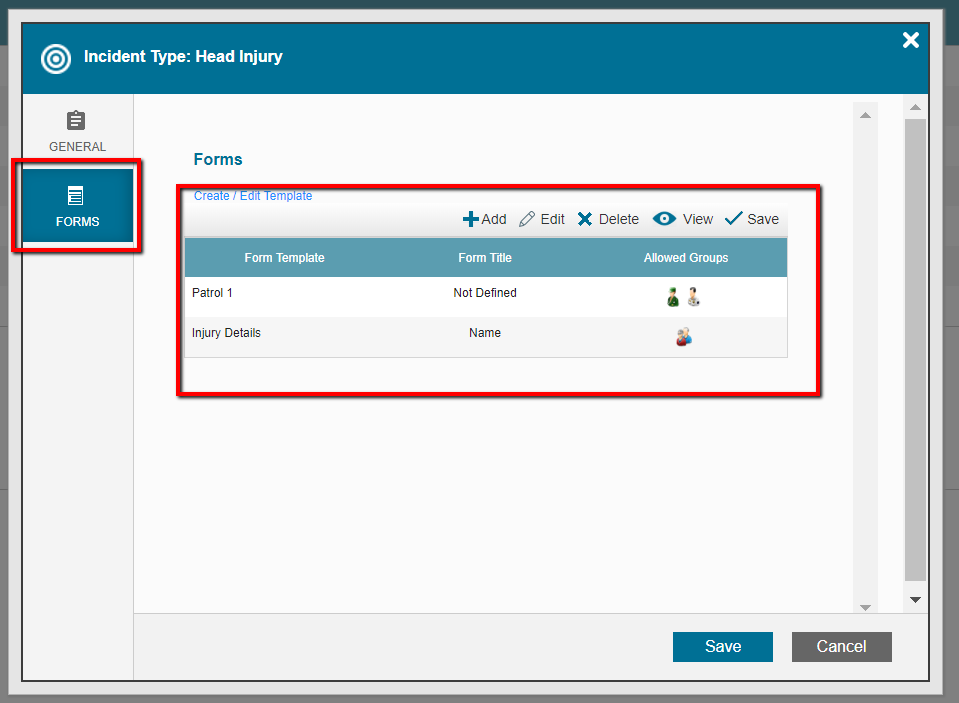
We have an incident type called Head Injury.
There are two Form Templates linked to this incident type:
- The Form Template called Patrol 1. Since we have not set a field in the Form Template as Dynamic Form Title, we have no title for this form (hence Not Defined). Only users who are members of the Managers and Patrol groups can view, edit, and duplicate this Form Template.
- The Form Template called Injury Data, where the Name field in this Form Template is set as Dynamic Form Title. Only users who are members of the ‘Medical’ group can view, edit, and duplicate this Form Template.
When a user who is a member of the Managers, Patrol, and Medical groups opens a new Head Injury incident, the user sees both forms and their names are based on the ‘Form Title’ as defined above.
The form title in the new incident consists of the name of the Form Template (for example Injury Data) + the name of the Dynamic Form Title field (for example Name), if defined:
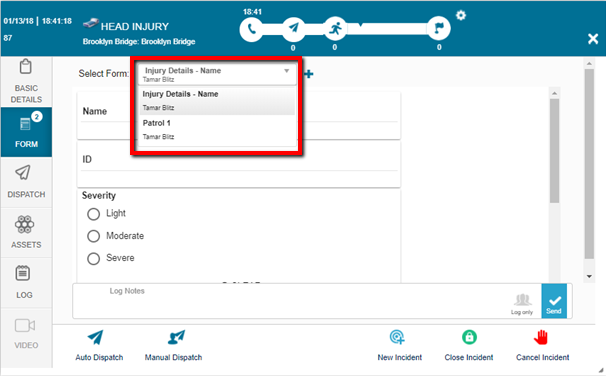
A user who is a member of the Managers and Patrol groups sees only the Patrol 1 form template. A user who is only a member of the Medical group sees only the Injury Data form template.
After a user fills in the Name field in the Injury Data template form, the form title changes to the value of this field, which in our example is David Lo:
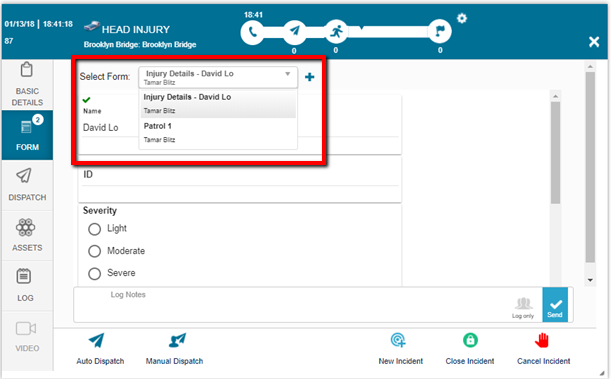
The form title of the Patrol 1 form remains Patrol 1 because no field in this form template is defined as Dynamic Form Title.
If we duplicate the Form Template, a sequential number is added to the Form Title in the new incident:
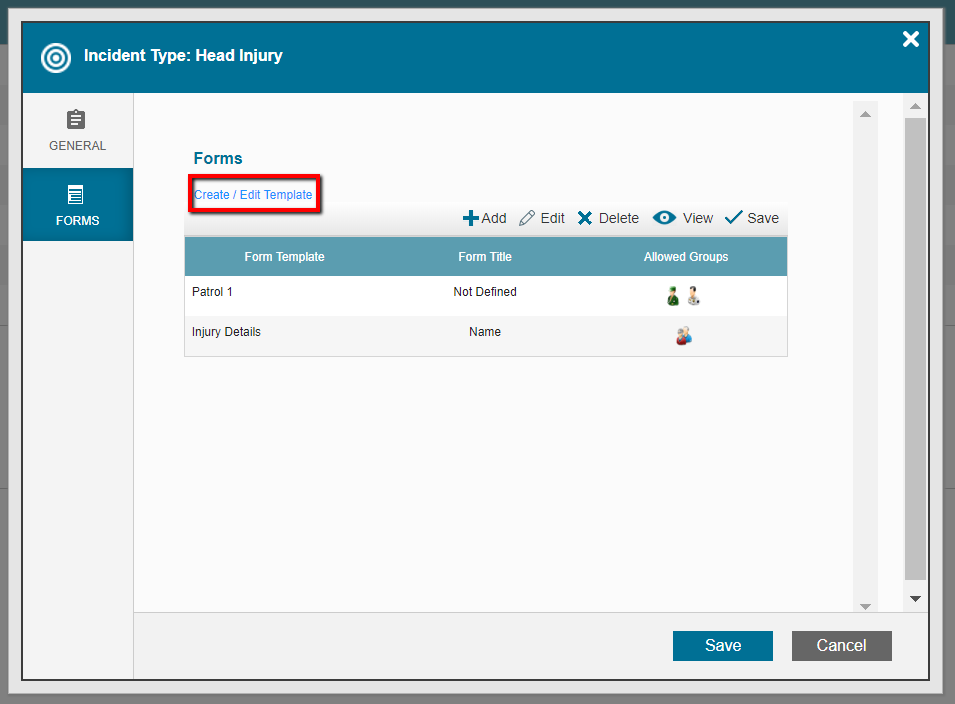
There is an option to create a new form template or edit one by clicking Create/Edit Form Template. Read more about creating and editing an incident form template.
- Click Save and the Dispatch tab becomes accessible.
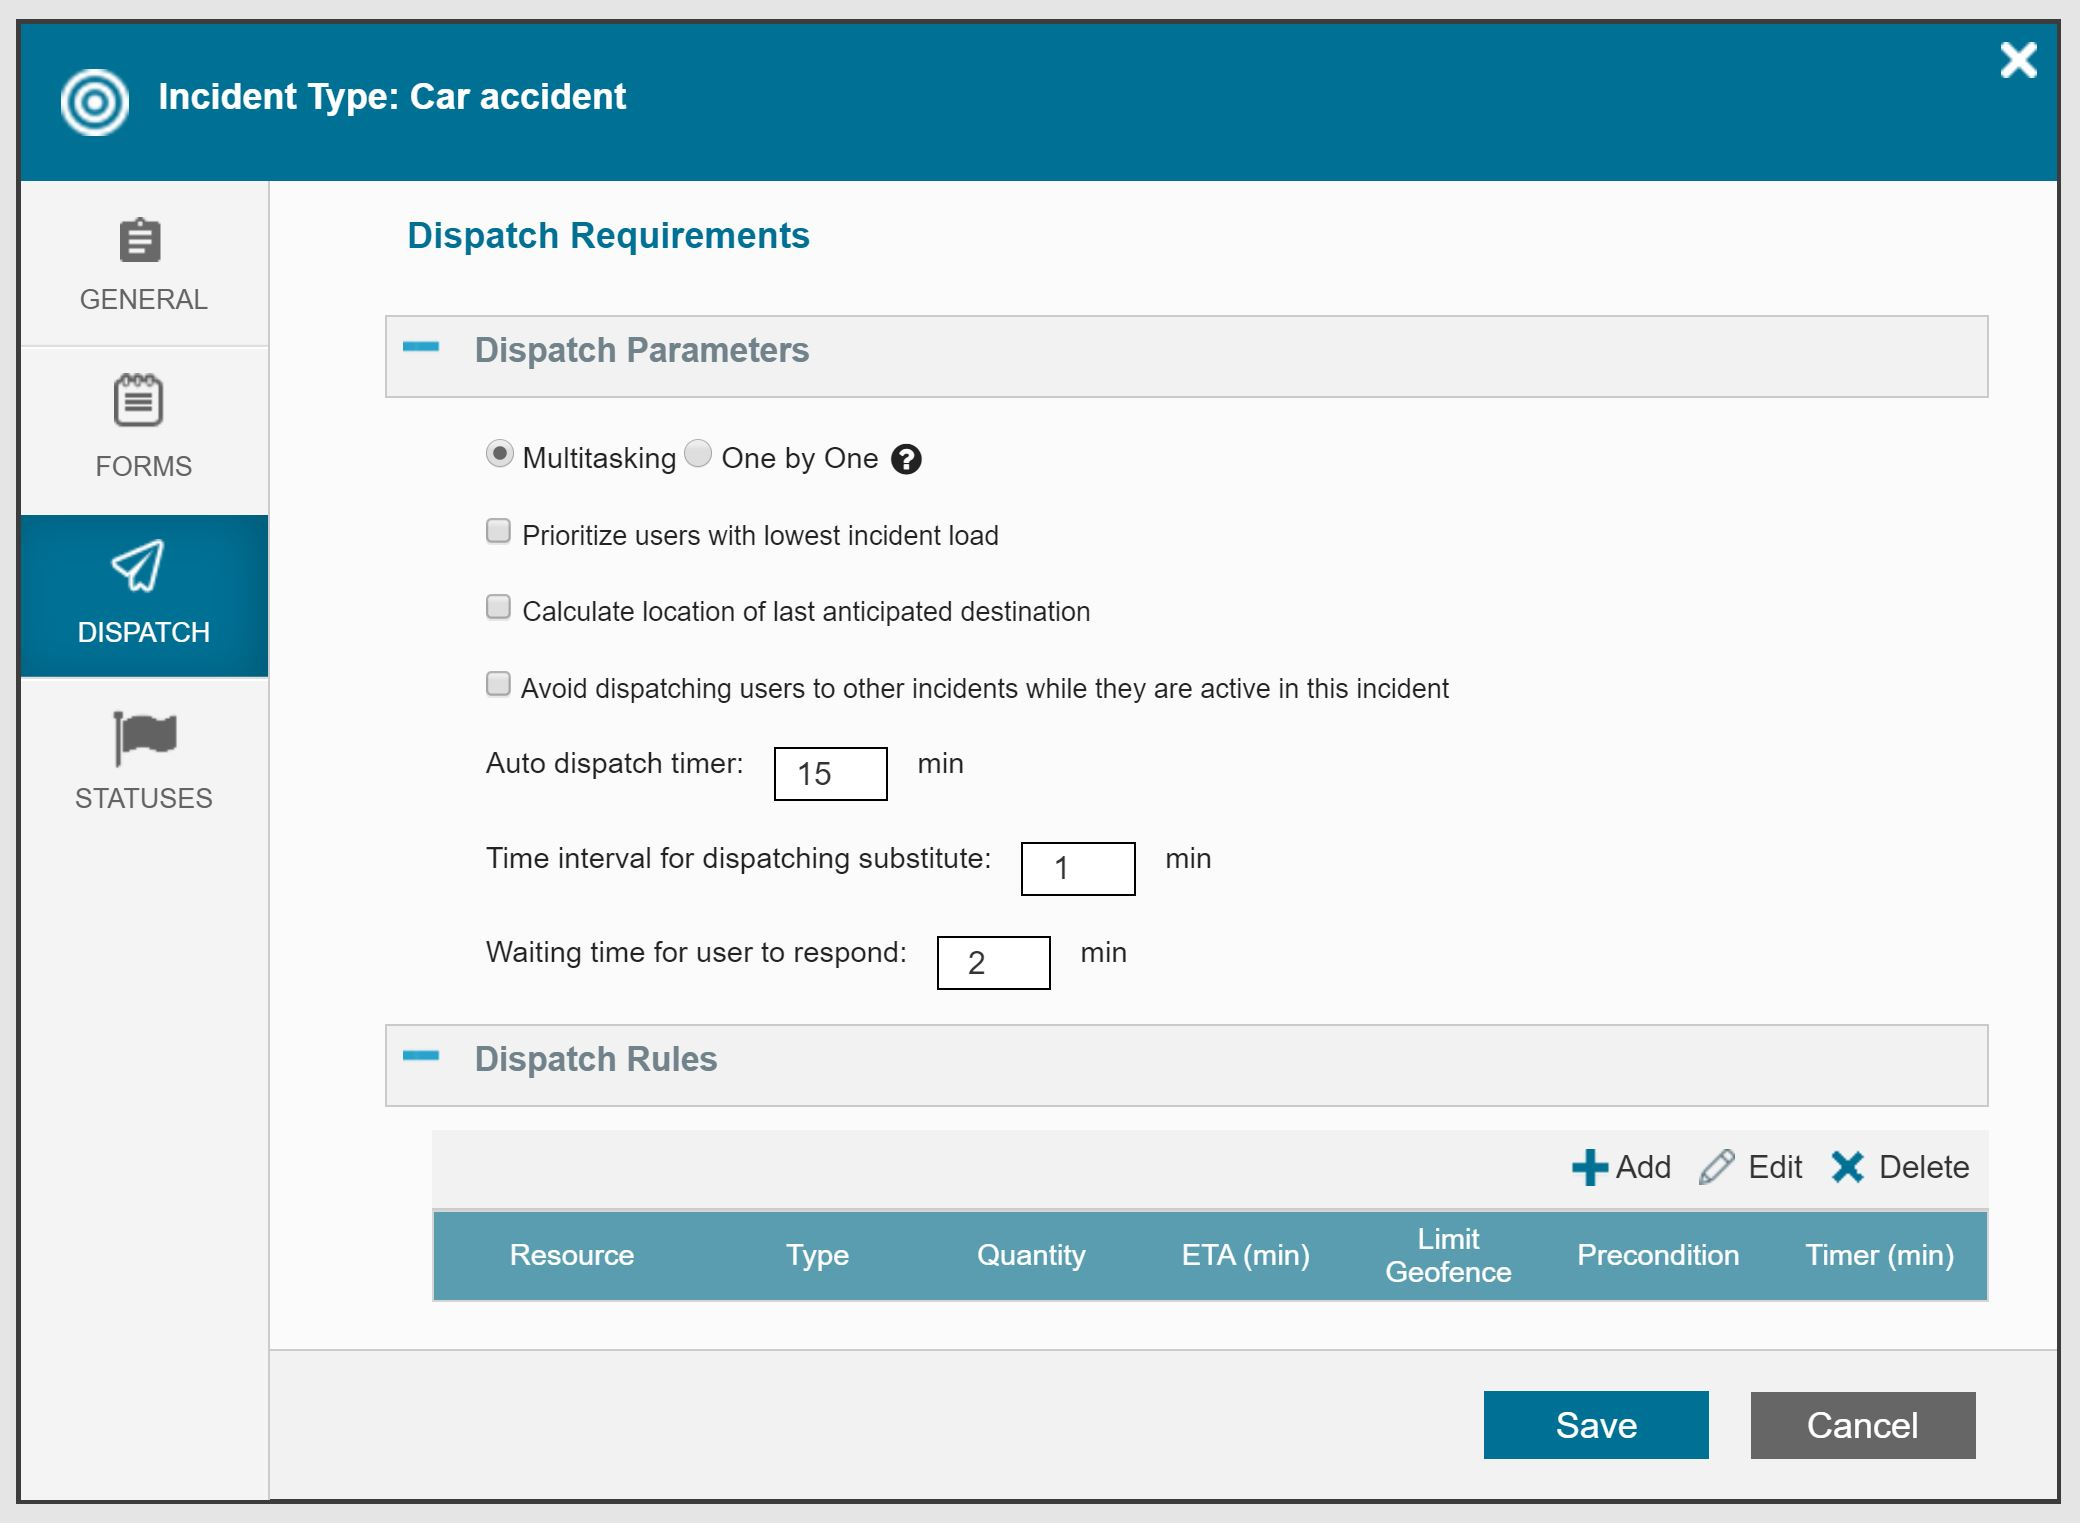
- Dispatch Parameters:
- One by One – If an incident type is defined as “one by one”, the automatic dispatch engine will not dispatch Responders to this incident if they are already active in another “one by one” incident.
Note: If you do not check the One by One checkbox, this incident type is set by default as a multitask incident, meaning a Responder can accept this incident while responding to previous incidents.
- Prioritize users with the lowest incident load – the automatic dispatch engine will prioritize incident load over ETA. This dispatch rule is relevant for organizations that prefer to distribute incident load evenly rather than always dispatching the closest person.
- Calculate last expected destination location – the automatic dispatch engine calculates ETA of candidate responders not based on their current location, but based on their expected location/destination after completing all assigned incidents.
- Do not dispatch users to other incidents while they are active in this incident – when the automatic dispatch engine searches for relevant responders for OTHER incidents, it ignores responders who are already active in this incident type.
- Complete the preference settings for Dispatch Requirements for this incident and click Save.
Editing or Deleting Incident Types
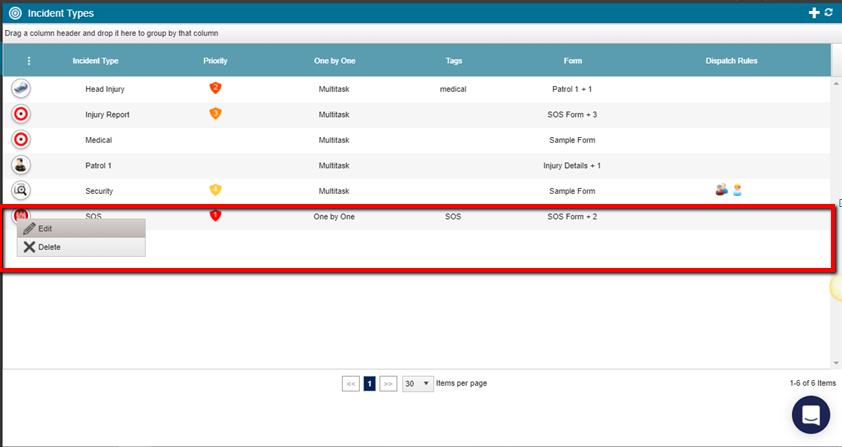
- To edit incident types, go to the incident type and choose Edit.
The Incident Type window opens and is editable.
- To delete an incident type, go to the incident and choose Delete.
A warning window opens.
- Click Delete again to remove the incident from the list.
Linked Mentions
0
No backlinks found.
Unlinked mentions