
Welcome to the online user manual for our dispatcher software. In this manual, we explain how you can define and assign user roles in our system.
Adding a New User
When adding a new user, you must assign them to a role. Follow the steps below to add a new user and assign a role:
- Go to the home screen and select “Settings” > “ORGANIZATION”.
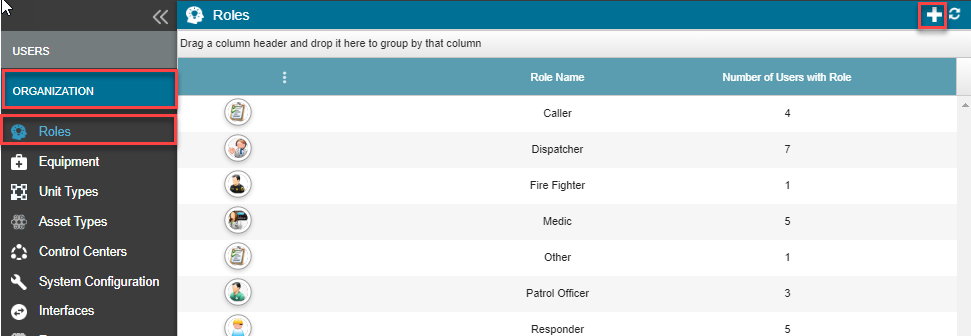
- The “Roles” overview opens and displays a list of roles in alphabetical order.
- Click the “+” icon to add a new role. A pop-up window called “Add Role” will appear.
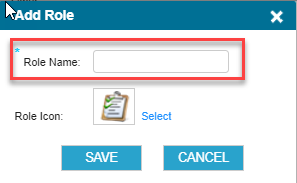
- Enter the desired name of the role in the “Role Name” field.
- Use “Select” to customize the role icon.
- Click “Save” to add the role.
Managing User Roles
Now that you know how to add a new user and assign a role, we can proceed with managing user roles. Below you will find an overview of the steps to configure user roles:
Step 1: Accessing Role Settings
- Go to the home screen and select “Settings” > “ORGANIZATION”.
Step 2: Editing an Existing Role
- Find the role you want to edit in the list of roles.
- Click the pencil icon next to the role name to edit the role.
- Modify the name or icon of the role according to your preferences.
- Click “Save” to apply the changes.
Step 3: Deleting an Existing Role
- Find the role you want to delete in the list of roles.
- Click the trash can icon next to the role name to delete the role.
- Confirm the deletion of the role in the pop-up window.
Note: Ensure that you only delete roles that are no longer needed and do not have access to important tasks.
You can now define and manage user roles in our system. With this manual, you are well-equipped to use the dispatcher software optimally. If you have any questions, please consult our comprehensive user manual for more information.